Just wanted to say ... thanks for taking the time to stop by, hope you enjoyed your visit.x

Monday, 29 June 2015

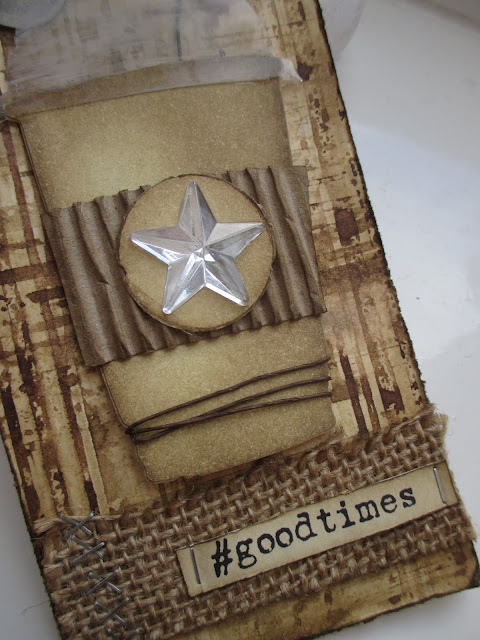
My take on Tim's tag for June ...just!

Well yet again having been full of good intentions to create my tag early in the month time and life just ran away with me so here is my take on Tim's tag for this month..phew just made it!


Well you know me , I do love my neutrals...so that is what I used for my version of the crafty masters tag...all the details can be found here  .

I followed Tim's steps but changed certain bits, cutting my cup from ivory card and colouring using distress inks..and I created my background using some of the mini distress ink pads in my favourite browns.


I love the different textures and instead of string added some wire..


Instead of the stiching I added some little staple kisses and substituted the straw for a curly wire one!


I finished the top of the tag with some dyed seam binding tied in a bow...


I will be adding my tag to Tim's tag for June here ..better later than never xx


Thursday, 25 June 2015

Create memories for Country View Crafts

For my second offering over at Country View Crafts where the theme is shabby chic, I have continued to use my favourite neutral palette, plenty of ephemera and another of my own collection of vintage photos. So without further ramblings here is my make :


This is completed in the same sort of way as my first piece for the shabby chic theme which can be found here .

So for the background another piece of mdf cut to a square...and covered again with old music paper, softened with picket fence .. so instead of step by step ...as the process is similar ...a focus on some of the details ..

Again I sued one of my collection of vintage photos ...and even added the piece from the back of where the photo was taken . i added her inside a cabinet card from idea-ology range, some handmade outer flowers with bought swirl inside flowers...a flashcard...plenty of lace and some rhinestone trim..


I layered up different lace trim and some mother of pearl buttons for the vintage shabby chic feel...I hope ! x


More buttons added at the side..


 And here she is ... I wonder who she was and if she would like this ? who knows?


Anyway there is still plenty of time for you to play along with the shabby chic theme...over at Country View Crafts and you could be the lucky winner of a voucher for the wonderful Country View Crafts shop....and you could be a guest designer..

keep those fingers inky!
and those hearts full x
trace x 

Wednesday, 24 June 2015

Top dad

Just a quick one today to share the card I made for the children to send to Steve for father's day... 

So here it is :


I started by die cutting the trophy from a thick card and covered in Decoart crackle paste and left the paste to do its magic !

I then covered with a layer of grey Decoart paint and left to dry.


I love how the crackle can be varied depending on how thickly you apply the layer of paste


For the next layer I added a layer of black antiquing cream and then left to dry, rubbing back using a damp cloth ..allowing some to stay on the piece. I then applied a layer of matte sealer (again from Decoart).

Finally I applied a thin wash of quinacriodine gold paint...left to dry and re applied in areas..


Now for the background... I applied some frayed burlap to my craft sheet and a spritz or two of pumice stone distress spray stain. I spritzed the card and then swiped through the inky droplets...dried using heat tool and then re dipped into the remaining ink to create the splattered look. 
 I then heat dried again .


I added it to the card front, inked the edges with walnut stain distress ink and also added some stencilled detail using walnut stain.


I then added Dad , using worn text letters inked in jet black archival.


To complete the card I added some seam binding which I dyed with aged mahogany and tied around the handles. I also added a star to the front.


Well hope you like the card and will be back soon!

Monday, 22 June 2015

Don't forget - follow your dreams ..sneak peak for Country View Crafts

Well for my third offering over at Country view Crafts... I have yet again used lots of yummy distress goodness ...and some more photo booth!

For all the details of how I made these please hop here ...

I have made more than one...amazing how different they look !


Thursday, 18 June 2015

That's what friends are for - sneak peak for Country View Crafts x


Well it is my turn over at Country View Crafts again and this is another project using the wonderful photo booth dies .... for all the details please hop here...

here is a sneak peak of the project for today ..


thanks for stopping by and see you soon ..x


Sunday, 14 June 2015

Did I mention ...I love blueprints stamps?

Well here is a card I made using the new Robot Tim Holtz blueprints , which I made to send to my Dad for his birthday from the children...I love blueprint stamps and these are no exception...quirky and fun and great for all occasions ..


I started by inking the background of the card in pumice stone and edging in black sot and walnut stain, spritzing a bit of water to create a more dappled effect . I added a piece of torn paper from pocket cards and used the other piece in a different part of the card. I love creating all these layers.. and see not a found relative in sight!


I added colour to the little robot guy using distress markers scribbled on my craft sheet to create a palette and picking up colour using my waterbrush. I edged in distress ink using blending tool.


I added lots of idea-ology and some tissue tape to add details ... I scuffed up a flashcard and inked to highlight the sanded and scuffed bits .


I added some numbers...can you guess the age ? and crossed the mini attacher staples to create little kisses .


So hope you like my blueprint make, keep your eyes peeled I am sure these little guys will be making an appearance again..sometime soon x

It's an absolute age since I entered a challenge ..so thought I would enter this with some of my old teamies over at Frilly and Funkie , for their monochromatic challenge x

keep those fingers inky!
trace x

Wednesday, 10 June 2015

the love of giving gifts - sneak peak for Country View Crafts


Well it is my turn over at CountryViewCrafts today - using the Sizzix Tim Holtz pillow box die to create some decorated gift boxes...

so here are the boxes and all the details can be found here .


Monday, 1 June 2015

A gentle beauty - for Country View Crafts

Well it is the first of a new month and therefore a new challenge over at Country View Crafts and the theme this month is shabby chic chosen by the very talented Astrid.  

Now I went for neutrals which will come as no surprise to many of you I am sure and a very vintage feel for my shabby chic project number one, I will be back later in the month with another offering..so without further ramblings here is my make :


I started by covering a square piece of Mdf with some old music paper and then covering with picket fence distress stain to soften the music . After this I layered a piece of calico and then a piece of music ( from my vintage stash) - I chose this piece because of the crinkled and scuffed edges...love the texture .


I covered the sides of the mdf piece in tissue tape, gluing it into place to ensure it did not come off.


For the focal point of the piece I used one of my stash of vintage photos an encased her inside one of Tim Holtz cabinet cards, scuffing the edges to give it a worn feel.


I just love her ... the gentle look in her eyes ... I added some flowers made using tattered floral die with centres of rolled flowers..that sadly I bought as I have not mastered how to make these :( .


I added another at the top to balance the composition , complete  with some smaller flowers


I left this piece of writing alongside the photo.. as I liked it ..

To complete the shabby feel I added some lace layers and some dyed seam binding all in my adored neutrals..
and a metal idea-ology embellishment , coloured lightly with antique linen paint.


A couple of mother of pearl buttons complete this shabby chic feel piece... 


Make sure you hop across to the countryviewcrafts challenge blog to see lots more inspiration from my team mates and remember you have a whole month to join in the fun..

keep those fingers inky!
trace x