Just wanted to say ... thanks for taking the time to stop by, hope you enjoyed your visit.x

Showing posts with label creative expressions. Show all posts

Monday, 16 December 2013

With a touch of frost

So for my make for Creative Expressions today I have used the Henna collection singles stamps, which come pre cut and pre mounted x I have used these to make a mini canvas and a gift bag to put it in. So here we go :

 
The henna stamp I used is called Henna mosaic and is pictured below...


I started by spreading some silver pearl texture paste onto the mini canvas, making it thicker and thinner in different places, I then spritzed the stamp with water and stamped into some parts of the paste to create some texture .


 Once dry I covered the surface with iced spruce distress stain, such a yummy colour .


When this was dry I coated the sides in rock candy distress glitter and also spread some across the front...but found it hard to get it to show in the pictures :( . I then stamped the henna mosaic stamp and cut out the flower centres and coloured with iced spruce...adding wire stems and an ideaology word band .


The flowers also had some glitter added in a ring to the centre. 

For the bag I added some distress stains to my craft sheet and dabbed the bag in.


I added a flower, some wire and some seam binding dyed with same Distress Inks .


Well hope you like my frosty make , see you later for another of my takes on Linda's fab 12 tags of Christmas x

keep those fingers inky!
trace  x

Monday, 25 November 2013

all things grow with love for Creative Expressions

Well its official , I am now slowly stepping back into the blogging world and trying to catch up with all my much missed friends. so here today is my post for Creative Expressions , using the winter flowers plate. I have decided to go for a little tag book :


and opened :


So I will start by showing you how I made the flowers on the front, these were stamped with coffee archival and cut out from the stems, also snipping down into the centre of the flower in between the petals.


then inked with vintage photo and waterbrush and cut 


and then shaped


then into my melt pot full of clear UTEE, to give a real and shine and also freeze their shape


now for the book pages...I swiped Distress paint ...love this stuff onto my craft sheet and swiped, blotted and smooshed my tags ...


and extra spritz of water to let the colours do their magic!


when dry and all tags completed on both side ..time to get inky!


I over stamped the tags and built up the layers using Creative Expressions chicken wire and bubble wrap stamps, using them without a block allows you to stamp random areas and by rolling the stamp you don't get a full stamped image...


I then added the crocus stamp in coffee archival and the newsprint flourish stamp in black archival..


now for the images inside I stamped in coffee archival , tore round the edges and added colour using Distress markers and a waterbrush.


 I then tore around then inked around the edges...and we are ready to complete the book :


and here are the completed pages..before adding images , pre folded so they can be joined using hitch fastners.


I then added the pictures inside using a small piece of tissue tape in corners for the sort of old fashioned photo album feel...some idea-olgy and our flowers and sentiment on front and some dyed seam binding and we are all done !


well hope you like my make see you soon x

keep those fingers inky!
trace x 

Saturday, 23 November 2013

flutterby butterfly

Well last weekend lots of the Creative Expressions DT had samples on Create and Craft...a really exciting experience...we had been given the dreamboat 3 - in -1 collection sets from Couture Creations to play with. For this set I used Ornate frame.

Just before I show you, these sets consist of an embossing folder, some dies and also coordinating stamps....not being one to just stamp them, emboss them and die them ...this is what I did :

(Please excuse the photos playing with a new camera....that has now gone back!)


I am not a great card maker it has to be said and many of my samples were not cards...but this one is and I played with how to create layers. This uses the embossing folder but not as a whole piece, the dies and then the coordinating butterflies and background stamp...but not perhaps used as a whole.....I do like to play around to see how else things can be used.

The first layer was black, silver and pumice stone distress stain ...over stamped with the main image in black archival.


I then over stamped the corners with part of the main image. The next layer in the same colours was part of a #10 tag.


Here I used the same stamp but placed it off the edge of the tag to get part of the image.

Now for the next layer I added an embossed element using the folder across part of a #8 tag , and stamped part of stamp ..again in black archival.


Then layered up and added some butterflies and there you go . Here it is placed out to get an idea of placement before I glues all the layers .


Well thats it from me today.................have an great weekend...I am meant to be at a craft fair but poorly children..mean I am not! :(

keep those fingers inky!
trace x 

Tuesday, 19 November 2013

Creative Expressions Couture blog hop - hanging in there .


Well to celebrate the launch of the Couture Creations Dreamboat 3 in 1 collection we are having a fun and fab blog hop, so lets get hopping!

Welcome to the Creative Expressions Couture Creations Blog Hop! In order to get here, you must have come from Kim Dellows blog .
If you arrived here from Kim Dellow , then you are in the right place, ( if you need to check, click here for creative expressions news blog ) so here is my project using the couture creations 3 in 1 collection.


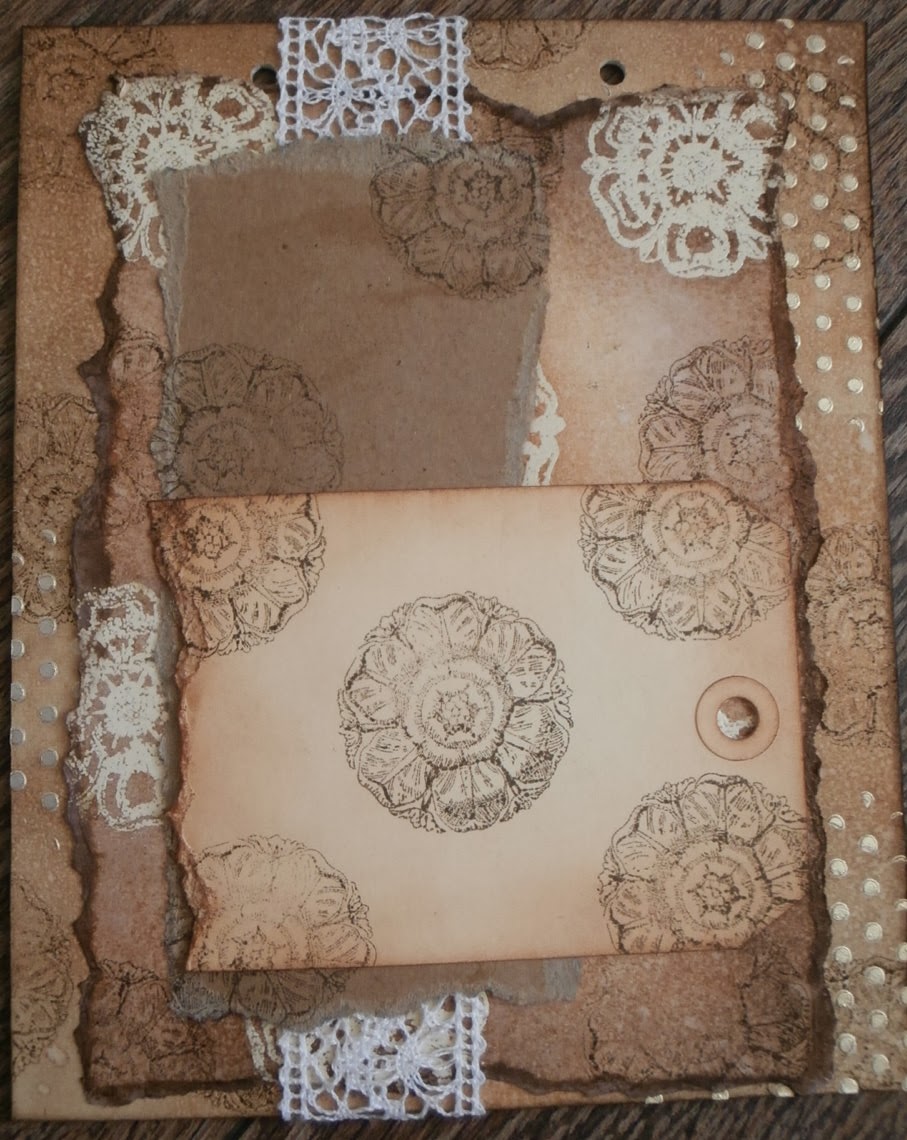
This is a large piece incorporating elements from pattern quilt set and also some butterflies fluttered in from ornate frame set. The great thing about all of the sets that we had to work with ( and have recently been in create and craft) is they are a set coming with stamps, an embossing folder and some dies.

I wanted to show how to use the set in a different way and used elements to help create the layers on my piece .
I started by inking some mountboard and applying some gold pearl texture paste through tiny dots stencil, then when dry I added the flower stamp to create  the first layer . This is the base piece...as this piece is all about building up the layers.


I next added a layer where the same stamp was used and clear embossed and then inked over and then a torn kraft layer also using the same stamp.


Then the next layer was part of a tag, torn inked and stamped with the same stamp...I also added some of the great lace from Creative Expressions . To show you a quick picture of how I planned my layers before inking and stamping to get an eye for the layout of final piece and the placement of elements before getting inky!


Now onto the final layers and design pieces...I added some flourishes from Spellbinders foliage 2 and lots of the gorgeous flower die cuts from pattern quilt set.


The stamps in the sets coordinate with the dies and allow for coordination easily. I added stamped detail to the flowers and also butterflies from ornate frame set.


well hope you like my make , happy hopping!

Thank you for visiting my blog, please leave a comment in order to be in with a chance of winning a prize! and believe me there are some great goodies! 

Once you have done that, you will need to click here to visit Cathi O'Neill

To help you along the way, here is a list of the Blog Hop:-

1.       Kim Robertson
2.       Pam Smith
3.       Neil Burley
4.       Donna Ratcliffe
5.       Tracy Heaton
7.       Kim Dellow
8.       Trace Metcalfe
9.       Cathi O’Neill
10.    Tracy Evans


If you get lost or want more details check out the post here : Creative Expressions news blog .

The prize for one random winner chosen from the comments on my blog are :

From This Day Forward Pre Cut Stamp 
Glitter 
Cosmic Shimmer Dries Clear Glue
Cosmic Shimmer Silver Shine Details Embossing Powder 

Thank you for taking part in our Blog Hop – good luck!
happy hopping.xx

keep those fingers inky!

Trace x 

Tuesday, 30 April 2013

anyone for domino's? - inspired by Brenda


well this is another make that has been sat patiently waiting to be blogged and this piece was inspired by the lovely Brenda , whose wonderful blog can be found here . It is full of lots of yummy creations , so make sure you take a look! So here is my domino book , inspired by the lovely Brenda:


Well it had to be brown and have cogs didn't it!!!
So lots of pics..sorry...

I used a combination of lots of Sam Pooles stamps for Creative Expressions...vintage Inventor, Vintage treasures and Vintage Illusion...love these sets... I also used some fab Tim Holtz ones and My favourite hand and steampunk gents!


I used all my favourite inks, in yummy distress colours, Distress paints, background stamps from Creative Expressions...and Archival ink to create all the stamped layers inside..


Then on the front my favourite mini gears and some of the fab new Rub ons from Tim Holtz...loving these! Oh and  a few Prima cogs that fell in my basket the other week! oops!


Thanks Brenda, I would never have tried this without your inspiration...


welcome to my new followers and thanks too everyone for all their kind comments here and on facebook, they are all truly appreciated!

have a fun and inky one!
trace x

Thursday, 10 January 2013

grunge it up!!

well as Thursday is usually my day for a creative expressions post
 I decided to show a tag
(no shock there then!!!)
 I have made using my one of my all time favourite sets of stamps vintage inventor..
so I indulged myself in a steampunk, grunged up tag..always cheers me up!
so here is my tag:
 
 
i started by embossing the tag using a metal plate effect embossing folder,
then covered in verday paint..
and let it do its thing!
 
when done I added some clear embossing dabber around the edge..
this is fab because you can dab just where you want
and added tea dye distress embossing powder which has a fab texture
and almost rusty appearance..LOVE it ..
(great for another texture and element to piece ..)
 
 
I then stamped the little spring stamp and embossed
with the tea dye distress embossing powder too..in random places ..
 
 
the cog die cuts had the same treatment as the tag and the fab nuts
in the centres are from eco green and can be found here..
they were dabbed with espresso paint dabber and then tea dye distress powder added
 
I then stamped the inventor..just LOVE him!!
 
 
and the words onto card and distressed
you didn't think I could make a  tag without distress ink!??
 
finally I added a fab key embellishment..
 
 
well that's all from me today..
I do love this set of stamps..! did I say!?
 
I  following competitions..
 it is embrace the old @ simon says stamp and show  


have a fun and inky one