Just wanted to say ... thanks for taking the time to stop by, hope you enjoyed your visit.x

Monday, 22 April 2013

just hanging around ...

well another weekend bites the dust! It has been a hard week but James managed four mornings ..this week is going to be hard for him as today all his friends are off on a week long residential trip and James has been told he is not up to going! To say he is devastated is an understatement! Thanks to everyone ... for their thoughts..means a lot. (So James is at home this week, doing his school work.)

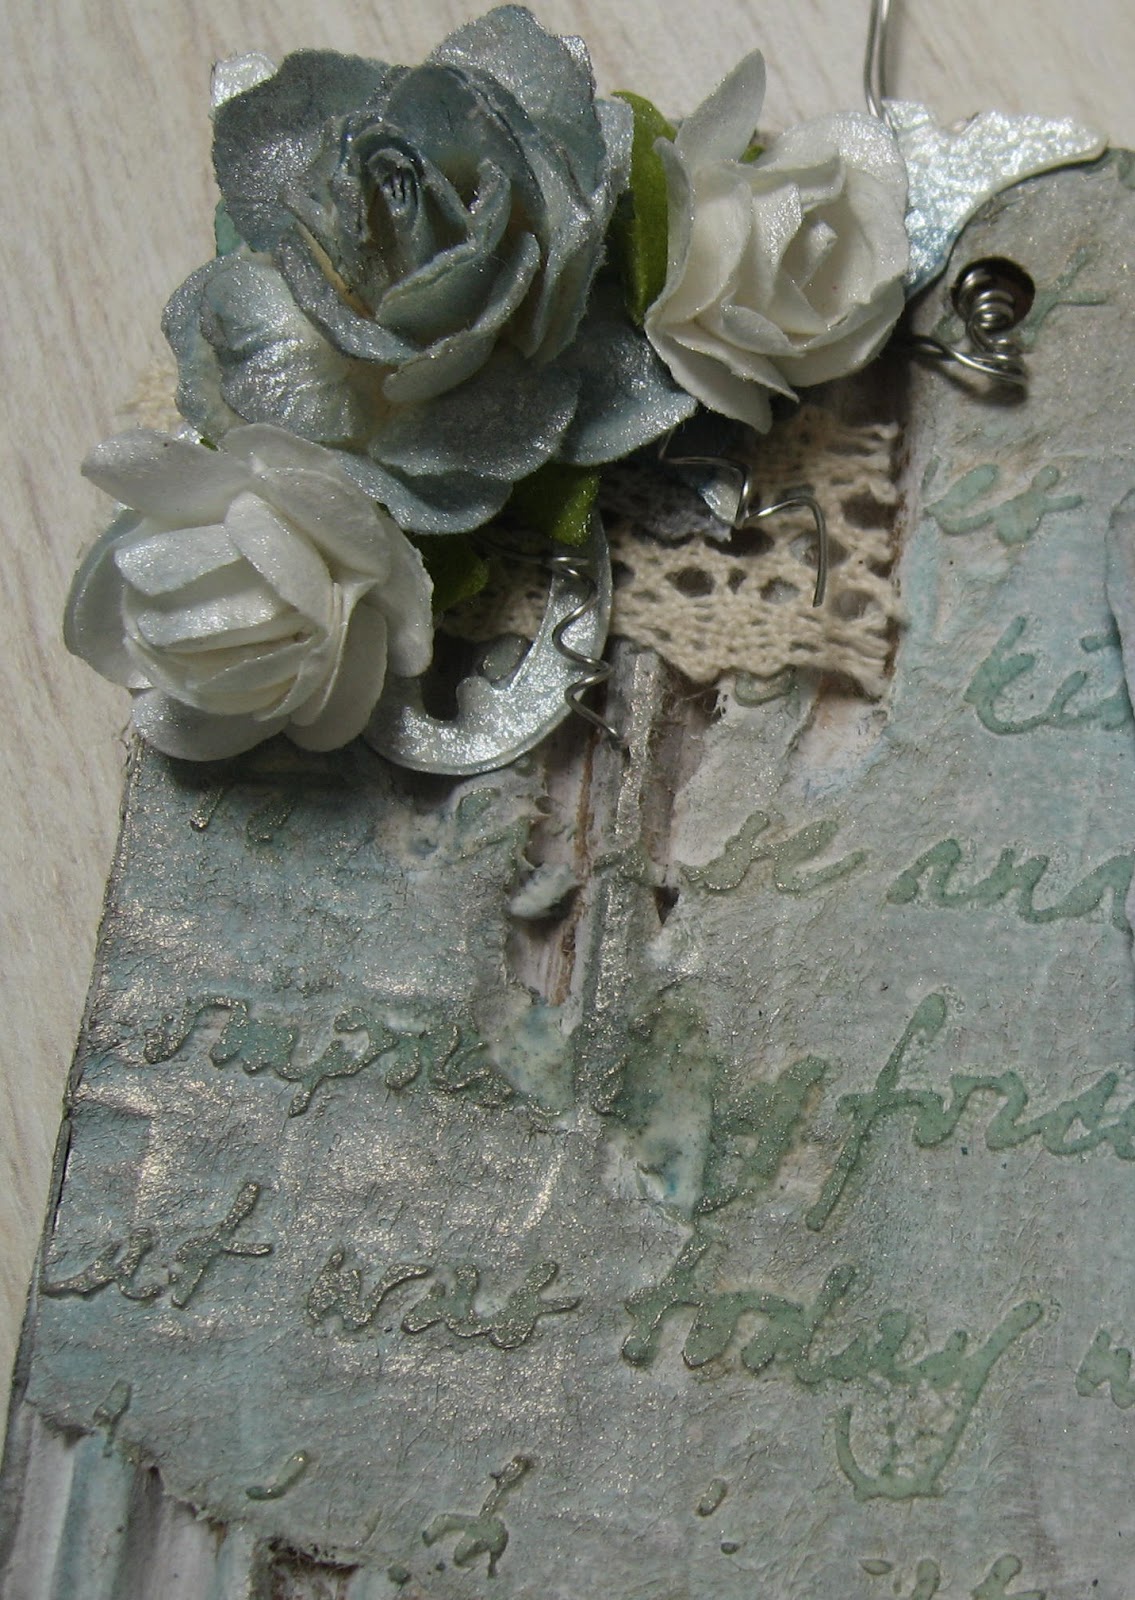
So onto craftiness ... I made this hanging last weekend and it is another play with an old amazon cardboard box, which I cut a panel off and here is my make :


I started by pulling off some areas of the card and the covering the whole piece with gesso. I then applied some texture paste through the art is.. text stencil..one of my favourites! When dry I applied distress ink in frayed burlap, weathered wood and broken china.
Once dry I added some white fire treasure gold.


The image a gorgeous Artistic Outpost one was stamped with weathered wood and clear embossed as I wanted it to almost fade into its surroundings. I then coloured with distress inks and flicked with water.


The sentiment is also an Artistic Outspost stamp from think and wonder set.


I added some crochet lace and flowers which have been sprayed with a homemade stormy sky spray, and then perfect pearls.

Some twirls of wire and there you have it!

I am entering this for the following competitions:

anything goes @ Artistic Outpost referral theme  
colour @ Simon says stamp and show
texture @ Artistic Stamper

have a fun and inky day!
trace x  

Friday, 19 April 2013

one stamp at a time 2 ways part 2 , for creative expressions dt

well here I am same time, same place to share part 2 of my makes with the same stamp, the first part can be found here .
So here is a reminder of tag 1 and 2:
tag 1

So onto tag 2 and a tutorial...

 
both these tags use the same great watch face singles stamp, which comes pre cut and pre mounted and you actually get 2 stamps of the same design in different sizes.
 

Step 1:
take a tag and ink up using distress inks and blend the colours, I used broken china, crushed olive, dusty concord and barn door.

Step 2.
Now cover the tag with the mechanical mask and re apply the colours of distress inks through the mask.

so where you applied broken china, re-apply over the same are being careful not to move the mask, and so on for all the colours. When you remove the mask you should be left with this :


Step 3 :
I distressed the edge using an edge distressing tool and then applied some soft black soot distress ink around the edge.

Step 4:
ink up the bubble wrap background stamp using archival ink but instead of inking as normal rub the archival across the stamp to give a softer inking and therefore softer stamped image.
Hope you can see here how lightly the stamp is inked this way..

 Step 5:
Now ink up the watch stamp, taking the archival ink directly to the stamp as normal and stamp in the middle of the tag.


I then lightly inked up the alpha writing stamp, again lightly and applied to the tag..hope you can see all these layers in the tag above..

Step 6 :
Now I used some of the fab cogs from vintage illusions set, inking some softly and some in normal manner to give contrast in stamped colour..see below:

 Step 7:
Add some white doodling using a white pen and dye some seam binding using black soot. Oh and add the sentiment, also from vintage illusions set.


Well if you are still here , thanks and hope that you have found this tutorial useful.. If you have a play please drop me a line I would love to pop by and see your makes ..

thanks for stopping by
 
have a fun and inky day!
trace x


Thursday, 18 April 2013

one stamp at a time, 2 ways for creative expressions DT part 1..

well here I am today , with my makes for creative expressions..yes two makes from one stamp today and both very different. So we were lucky enough to have some of the new singles stamp range which can be found here., they all come pre cut and pre mounted. This time I am using the watch face..there are two sizes of this fab stamp in this pack and I have used the larger for both of these projects.

So here they are , I wanted to show how one stamp can be used in very different ways and certainly stepped out of my comfort zone with one of these, can you guess which one?

 
both tags use the same stamp and mechanical mask in different ways


So these two tags use the same fab stamp and hopefully show how very different looks you can create!

So tag no 1..firmly in my comfort zone and tag 2 firmly out of comfort zone!

tag 1:
so for this tag I started by spreading some of the yummy studio 490 embossing paste (silver)through the mechanical mask,onto a tag, then when dry I ran this through the replacements  embossing folder, love how this texturises the embossing paste and no cracks of anything... then I coloured the rest of the tag with black soot distress ink.


The mini gears were cut from card that had the paste lightly smoothed across, dried and then embossed.


The gears are secured in place using screw head brads from creative expressions.


The watch face was stamped using black archival and cut out. I then applied crackle accents to it and left to dry but rock candy would work well too.


To complete the tag I added some old chain and tucked behind the watch face, some silver wire through the tag hole at the top and a sentiment (stamped and embossed with black detail embossing powder ) from the fab set Art Sayings..which is packed full of sayings for all occasions.


So for tag 2 , same time same place tomorrow and I have put a tutorial together for this one.

hopefully see you tomorrow for part 2...

have a fun and inky day!
hugs trace x


Wednesday, 17 April 2013

playing with ...wait for it...pink!?!

well here I am better late than never ..with my make for dragons dream DT. So this time the lovely Elizabeth has dreamt up our recipe and it is ..pink, a face and fabric. The only other rules are make a tag and use at least on real stamp...

So as most of you who stop by here often will realise pink is oh so not me or my colour and although my little Lucy (3) thinks pink is the best colour EVER!! I cannot admit to sharing here taste...give me brown and blue any day.. but do you know what I may have surprised myself..

So here is my make for toady:


So I started with a tag..(no really?!!)..and some yummy distress paints in Victorian velvet and picket fence..oh boy I love these paints!! When smooshed and sploshed and dried I added some stamping in distress paint and Victorian velvet ink using Artistic Outpost set Generation Redux.

 
I distressed the edge and coloured with Victorian velvet and the set to work adding the stamped image and sentiment ( from Artistic outpost set Think and wonder).


 The fabric flower was cut from crinoline from the funkie junkie boutique and I added a resin flower embellishment.

The seam binding was tied in a double bow and had been coloured using distress inks. I love how seam binding just sucks up the colours and creates such beautiful softness and texture..love the stuff!


So make sure you pop along here to see the other fab DT makes, hope you find time to play along.

I would like to welcome my new followers and say thanks for taking the time to follow my crafty journey, I appreciate it...lots.

Thanks to everyone ..asking after James..he has done his first 3 mornings back and seems ok, tired but ok and I am thrilled that this may be the start of building him back up...fingers crossed.

I am entering this for the following competitions:

paint for Sunday Stampers

 have a fun and inky day
hugs trace  x

Monday, 15 April 2013

if you never did....

well today is back to 'normal', the boys are back and school...boo hoo... and little Lucy will be super fed up! It will be a tough day for James as he has missed lots of school and been the reason for my less than super blogging and commenting performance ..... so fingers crossed he will manage just mornings at school this week and not be too exhausted .. poor kid! many tests results still waiting... BUT.. I have given mysef a talking too...it could be far far worse, so stop being so silly, pull yourself together and get on with it!!!

So welcome to my little blog post today, inspired by the talented and lovely Tracy Evans whose blog post that inspired me can be found here . Now I decided to start super small and gain confidence as I am only dipping my toe in..so here goes :


Now I know it cannot compete with all the amazing stuff out there and the lovely Alison has an amazing make here , I have never tried this before and I love it! and this piece is me...so expect more to come ( I know there is as I had a play after this and braved some bigger ones! ).

I started with a blank coaster and arranged my goodies onto it


Then covered the whole thing in a coat of gesso, I liked plain and covered in gesso, so when I got to the spraying part felt a bit nervous to say the least..after much spraying, with colour and water I was happy and left to dry. I used white linen and calypso teal and water and then I made some sprays with distress re-inkers...namely stormy sky and gathered twigs.


I then added some dry brushed gesso for highlights and pearl moon gilding wax ( pearl moon ) from creative expressions..love this stuff!!

The sentiment is from Artistic Outpost - Think and Wonder. Finally I edged in walnut stain..so for a first go I am chuffed......


Right well I am off to get this whole school thing done...thanks to everyone for sticking by and I promise to keep up with commenting and blogging much better , but I hugely apologies if there is the odd hiccup along the way............

Thanks it means a lot,
have a fun and inky day!
trace x

Friday, 12 April 2013

hanging tough for creative expressions DT

sorry for the title... today I have a simple hanging as life has been a little tough here of late..so hence lack of posts and slower comments... SORRY!
Anyway here is my make for Creative Expressions this week using one of the new stamps to die for , designed to coordinate with spellbinders dies..however I have used my stamp differently.

So here it is :


The stamp I started with can be found here... and is called Jewelled frame, they come pre cut and mounted so are ready to go! I decided to show how just small parts of these stamps can be inked up to create great stamped effects.

I started with a rectangle frame and base art part which I painted with sand eco paint mixed with gesso . Then I use a fab Hels scraped paint technique and scraped paint across the surface. I used white paint and sand and bronze eco paint . On the frame part I coloured with vintage photo distress  ink when dry.


On the base piece I inked up the stamp using the fab new distress paints in picket fence and stamped randomly.

On the frame piece I stamped in antique linen distress paint and then when dry , used a tiny piece inked in coffee archival to just the corners.

 
I then glued the frame and base together using the fab cosmic shimmer glue. Then when dry and believe me this doesn't take long .. I painted the side parts in bronze eco paint. When dry I then added a smidge of the new gilding wax and these are yummy, this one is pearl moon.. and I now need them all...!

To complete the piece I made some roses using spellbinders spiral blossom 3 die.. my first spellbinders!! from paper I had scraped paint on.. and then added some gilding wax to the petals.


Some twirls of rusty wire and a sentiment from the fab Sam Poole set art sayings and the piece is complete.


well a simple make today, hope you like it.. next week I am going to be back with two very different makes using one stamp and a tutorial.. hope to see you then

have a fun and inky day
hugs trace x

Wednesday, 10 April 2013

April in Paris dt make for Frilly and Funkie

well it is time for another challenge over at Frilly and Funkie and the theme this time is April in Paris ...so here I am with a very me make in very un-me colours!!
Make sure you pop across and see the fab Dt inspiration and there is still time to join in...you may be winner.. and get a winners  blog badge or be a random pick winner and get some money to spend in Linda's lovely store here.

All the items I have used from the Funkie Junkie Boutique are listed at the end.

I broke out some under used distress inks in un-me colours and set to work..
so here is my make :

 
 this is the outside and then the inside...
 
 
I started by cutting the arch shapes using my new Tim die, from mountboard and also from cardstock. I needed four from cardstock and two from mountboard . I joined the mountboard ones together  together using tissue tape.
 
The front two pieces of cardstock were coloured using shaded lilac, and brushed over with some shabby shutters. Then I added some dusty concord around the edges. When dry.. I  added some stamped flourishes .
 
 
Inside I embossed the pieces using the new release embossing folders and added colour using same distress colours and and edging with dusty concord.
 
 
The tiny arch for the sentiment was cut using the 3 arches dies..movers and shapers which also fell in when I was shopping!
 
 
Onto the flowers..I sprayed my craft mat with Dylusions sprays in dirty martini, crushed grape and white linen and sploshed cardstock in. When dry ..ok I blasted it with my heat gun I die cut lots of flowers using tattered floral strip die. The leaves were from the same die.


The seam binding was coloured using distress ink from craft sheet and I added some butterflies stamped in purple and then dipped into UTEE using melt pot.


Well hope you made it to the end..the shopping links are below...


have a fun and inky week
trace x