Just wanted to say ... thanks for taking the time to stop by, hope you enjoyed your visit.x

Showing posts with label distress markers. Show all posts

Wednesday, 4 February 2015

Dabbling with DecoArt

Well over my time out from blogland , I felt I wanted to play with something new to keep the old grey cells going....I had briefly tried some of Andy Skinner Timeworn Techniques but never found the time to really play....now I had a break from blogland and had a break from crafting...the need to get painty and inky was back...so playtime...some kind words from Mark Gould and I was off to dabble....

Armed with some new DecoArt goodies thanks to my lovely hubbie...I set too, to just play..and here is the first piece finished..be gentle!


So I didn't have a total end in mind, just to play with the paints and mediums and see where I ended up ....I wanted to play with some colour...and lots of the yummy texture creating mediums....

I coated my mdf board with some gesso and then applied some crackle paste in places and also some modelling paste , stippled in opposite corners...just playing to see what happened...


I then added colour over the whole piece... and built up the layers of colour using a brush and also rubbing some of the colour on using my fingertip.... I used blue green light, cobalt turquoise hue and cobalt teal hue. Then some quinacridone gold, all from DecoArt media line .


....around the edges I applied some crackle paste and layers of paint.....


Just love the crackle , yummy! I love the smudgy feel of applying some of the layers of paint with my fingertip , rather than a brush..


So here are some close ups of the finished piece... I used a technique from Andy Skinner's Timeworn course...so cannot divulge the details but details of the course can be found here.


 For some of the idea-ology and die cuts I dry brushed some additional paint over them.


Here is the difference in the finish of the cogs... I used a splatter brush over the background to splatter paint across the background.. and aged the word band using some paint rubbed across using my fingertip.


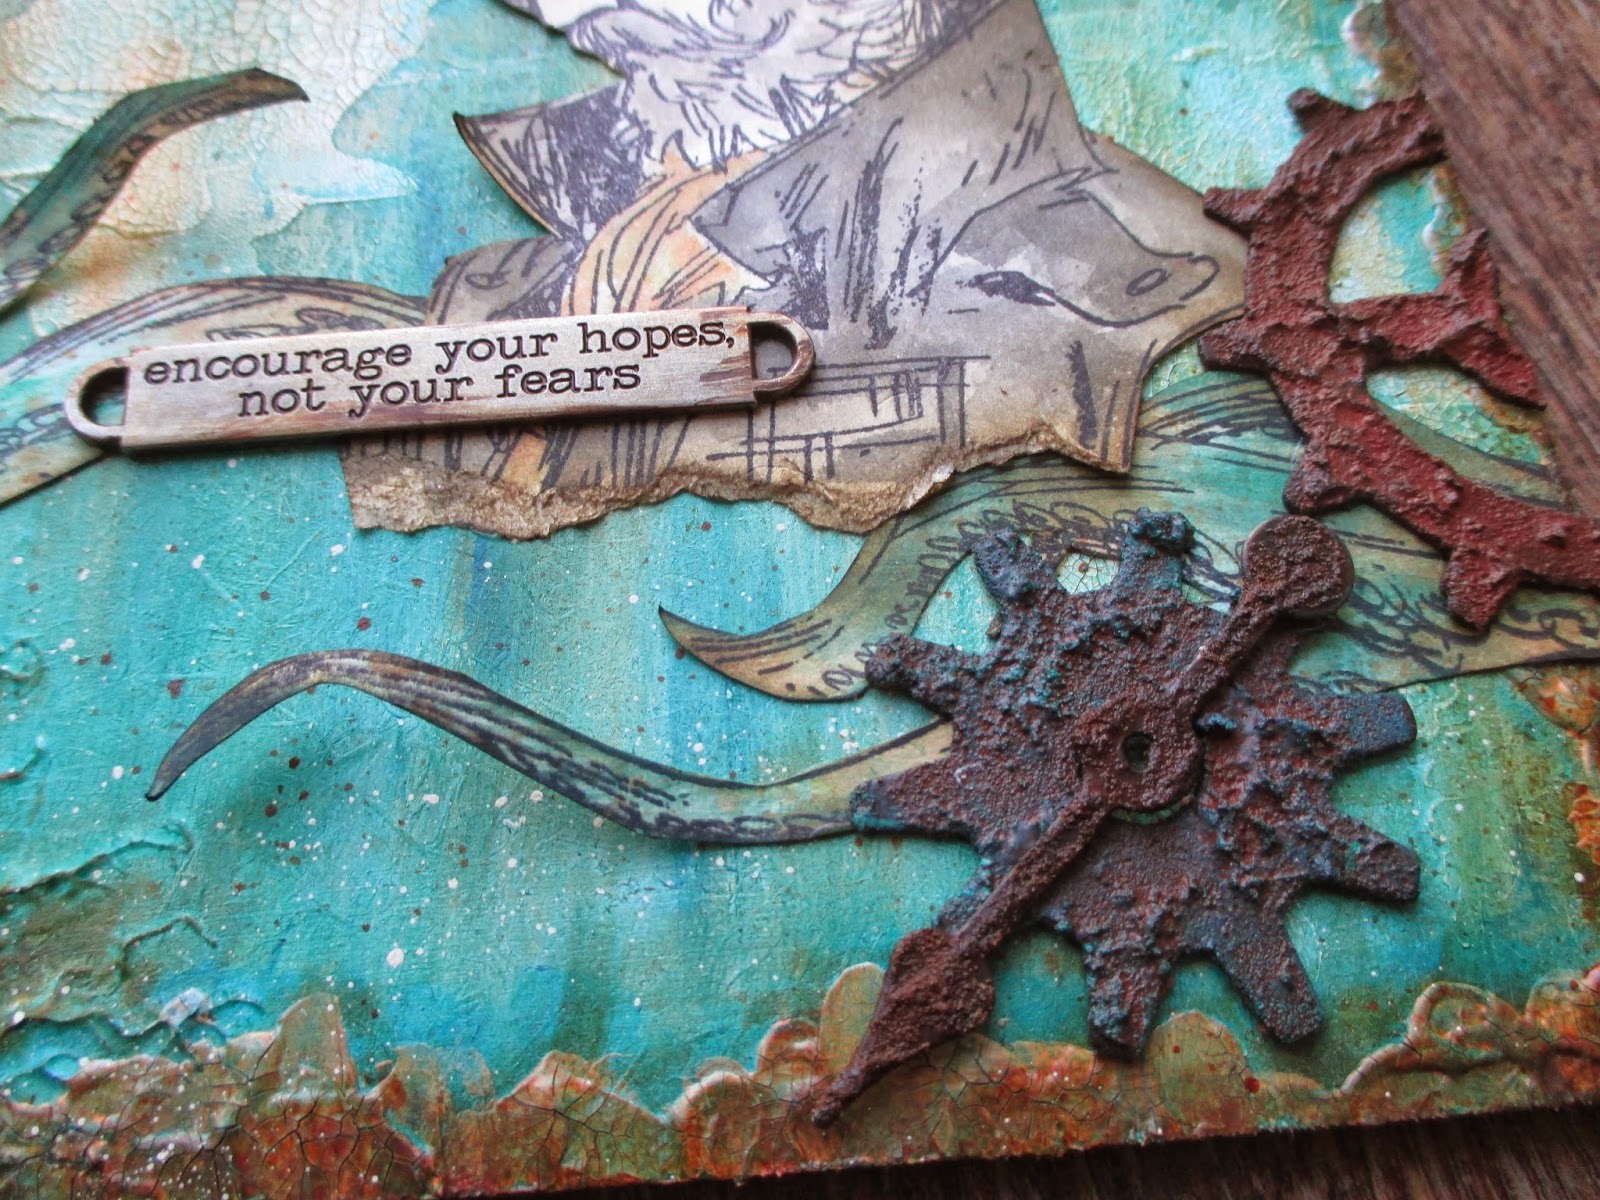
Here is a close up of the stippled texture of the modelling paste which..I so want to play with some more...and this piece was all about playing and experimenting..


I used some of Brett Weldele's stamps and felt this ship's captain and the tentacles fitted the background colours... I coloured the images using distress markers.


Anyway, thanks for stopping by...I hope you like the first results of my playtime!

keep those fingers inky and painty!
and those hearts full.x
trace x

Tuesday, 4 February 2014

Pure indulgence

Well you know we are all so busy and my life right now is so busy I wonder how I find time to eat let alone anything else but....having been thoroughly spoilt for my birthday( thanks hubbie and children!)...it would be rude not to indulge in a little playtime ...just for me....So after much deciding...over which set of yummy new stamps shall I play with first...(yes I was lucky some new Tim ones and some new Brett Weldele ones ...and lots of other goodies....very spoilt!) I decided upon this fab gentleman from the ships captain set...and the rest was pure playtime....

So here are the results a large tag ...just for the pure pleasure!


I started by playing with some distress stains....namely faded jeans ...hasn't been off the shelf in an age and thought it might be feeling unloved! and evergreen bough...So I smooshed and spritzed until happy and also did an extra piece which I set aside  for the tentacles to be stamped on.
 I then edged in walnut stain distress ink...gosh I love this colour!


I stamped the tentacles onto the background and added a bit of colour with my trusty distress markers and then when dry a smidge of walnut stain.


Now for this rather captivating chappy! I think he has gone to the top of my favourites...there is something about him...stern yet captivating! maybe its just me . I coloured him with my much loved waterbrush and distress markers...tearing the bottom edge and inking .


finally lots of yummy idea-ology, in my book a girl can never have enough cogs!and some dyed seam binding...and voila happy me and happy playtime pleasures !

keep those fingers inky!
trace x 

Monday, 6 January 2014

Do a double take for Creative Expressions DT

Well this month over at Creative expressions we have been playing with antique dressforms plate and also some of their singles range from which the bags below come. These singles range come pre cut and pre mounted ...so are ready to go!  I decided to play around with texture paste and gilding wax to make two cards that are the same but different!

So here is card no 1 : using singles stamp ..bijou bag 


and here is card no 2 : using  rose blossom purse


so card no 1 . I started by creating a background using clear texture paste mixed with antique linen distress paint and spreading it on , then spritzing newsprint flourish stamp with water and stamping into paste to create some texture.


When dry the rest of the background was coloured using frayed burlap distress ink. For the bag itself I stamped the image using frayed burlap distress ink and then clear embossing. I water coloured the bag using water brush and distress markers in antique linen and frayed burlap.


For detail I added some polished silk glitter in sahara. I also stamped the sentiment from the set and added some cheesecloth and a paper rose dabbed with distress paint .


For card no 2 : I created another background , still using paste but through some old sequin waste , and when dry coloured with frayed burlap Distress Ink. I also highlighted the raised areas with enchanted gold gilding wax.


The paler areas are where I flicked some water and blotted off some of the ink...it is so much fun to play creating backgrounds..

For the bag ( rose blossom ) I stamped in frayed burlap and clear embossed and then painted the main body of the bag using the gilding wax. I did this by scooping a little into a palette and adding a couple of drops of blending solution... you may choose to have some ventilation...and then mixing into a paint. I have kept a dedicated brush too.


The edges of the bag were coloured using distress markers and I added some dots of gold pearl pva for the clasp.


Another sentiment, some cheesecloth and a flower and a little flourish stamp and there you have it , 2 stamps, 2 cards... the same but different!? 

thanks for stopping by it means a lot ...see you next week when I have been playing with the antique dressforms plate x 

Make sure you pop across to the Creative Expressions news blog where all the DT show case their projects on a daily basis .x

It takes courage to grow up and become who you really are.  ~e.e. cummings


Saturday, 30 November 2013

feeling festive ?

Well I have got into my Christmas Crafting a lot earlier this year in an attempt to keep my mind and body busy and also to gear up for a few craft fairs, which are rewarding in so many ways ..

So here is a quick Christmas Card ...I know a card.... 


I loved this stamp and don't know why, the shape the skate ...just appealed to me ...So wish I could show the shimmer on the background...but in my excitement to finish it I forgot to photograph the background...:(

I started my embossing the front of the card using this fab Tim Holtz snowflake texture fade and then inked with frayed burlap and weathered wood and sprayed with cosmic shimmer pearl spray .


For the main blueprint image I used my fab Distress Markers and also waterbrush and scribbled the colour onto my craft sheet , picking up with my brush. I then added a little rock candy distress glitter to highlight the edge of the boot and blade.


I edged the torn edges with distress ink and added one of Tim Holtz simple saying and there you have it!

Well I have some design team pieces and comments to catch up on , so I will wish you all a lovely weekend...there will be exciting changes on my blog really soon , as the lovely Susie is giving me a makeover! my blog...not me ...that may be a lot harder!

keep those fingers inky!
Trace x 

Monday, 28 January 2013

my take, on Tims tag January 2013..and an inspired ATC

well I had a ball playing along with Tim's tags 2012 and managed all 12, so here I am with my take on Tim's January tag for 2103   ..hoping I can make all 12 again!
If you haven't played along pop across here and see the master at work..the tags are packed full of techniques and Tim's eye for design and detail and great fun to play along.
So here is my make:
(I did stay as true to Tim's tag as possible ..because I loved it and had nearly all of the stash!)
I also made an inspired ATC..see later in post!


There are so many things I loved about this tag, the fab colour combinations..something I have not used together before..but definitely will again..yummy! I do love my distress!


The grungepaper cogs, fab love them!
Cogs , well you know me and cogs...don't know what it is but I love them!


I loved the stamped ribbon too...another will be using again...idea!
I loved making this tag..so much I made an atc inspired by the colours...oh and my new blueprint mini stamp just fell through the letterbox at the right time...


I loved the colours so much and just had to have a quick play with my new stamps..rude not too!
I added a spinner for a clock hand and added crackle accents around it. The image was coloured with distress markers and my waterbrush and scuffed and edged with distress.

 
I am loving these new blueprints...cannot wait to add some more to my collection!!!
I was naughty and bought two of the new mini sets..restrained I felt!!!


have a fun and inky day!
 
I am adding my ATC to artful times time ATC challenge and linking up my Tim's tag for 2103


Thursday, 11 October 2012

steampunk snowflakes for creative expressions DT

well it is time for my second Dt make for creative expressions
 with the fab steampunk set, designed by Sam Poole.
I love the fact that there are so many different elements to use in this set..
in so many different ways!!!
so here is my make:
 
 
i started by creating the background
for the card
using distress inks and then flicking water onto it
and then blotting and drying with a heat tool
this is a fab Tim technique..
 
when dried i added some garden wire,
cut to size with wire cutters
i attached this to the card using staples and my mini attacher
 
 
to make the snowflakes i stamped the shapes in broken china distress
and embossed using clear embossing powder.
i used one large and two small to make this card.
i then inked them with tumbled glass distress ink,
added broken china distress marker to the end of the bulb bit..
technical term..and blended using a water brush.
the filament of the bulb had added shine
in silver
 
 
finally to complete the snowflakes and add to the steampunk feel
and because i LOVE cogs..
i added some fab idea-ology cogs.
 
 
the 25 was grungeboard numbers,
coloured with distress ink and then covered in glossy accents
and sprinkled with loose rock candy glitter.
 
i hope you like my make!
i will be back next week with another make and a tutorial.
 
have a fun and inky day!
 

Tuesday, 1 May 2012

butterflies for dt piece for anything goes challenge blog

hey there,
well here it is , challenge time again for anything goes and the theme is flutterby butterfly, things with wings, so here is my piece:


I decided to have a play with some under used distress inks, Tim stamps and a chunky atc...
I started by creating the backgrounds for all the sides of the block, using DI, picket fence stain, and Tim stamps.

Side one:
The butterflies were coloured using distress markers direct to stamp..love the way this allows you to use the fab distress colours in such a precise way..not usually a pen girl!.The cogs are Tim die cuts, coloured using Di and embossed using distress embossing powder, which has fab release crystals allowing for a real distressed feel.. The quote is so beautiful, I love Tim's quotes, they are great!! The little bottles were filled with seed beads.I added some keys to the bodies.

Side two:
The clock die again was embossed using distress embossing powders, and the butterflies coloured and stamped in same way as other side. I added another fab quote and some floral trim, which I love!!! coloured with inks.

To complete a butterfly and ideaology knob on the top.

Lots of these products can be bought from Lynne @ http://www.craftden.co.uk/
Make sure you pop across to see the fab Dt work and pop in an entry yourself!!
I am entering this for the following competitions:
spring @ http://crafts4eternity.blogspot.co.uk/
spring @ http://panpasteluk.blogspot.co.uk/
spring colours @ http://snazzysdesignteamblog.blogspot.co.uk/

have a fab, fun and inky week
keep an eye for out for what the fab susie does here next!!! (see post below for details!)
hugs trace x