Just wanted to say ... thanks for taking the time to stop by, hope you enjoyed your visit.x

Showing posts with label card. Show all posts

Sunday, 16 April 2017

Hippity Hoppity for Country View Crafts

So here I am today with a sneaky peak of my post over at Country View Crafts, using lots of distress oxides and yummy Tim holtz goodies..

all the details of how I made these can be found here ..


Here are a few close ups of the details of the orange card..all details over at Country View Crafts here..


and the green toned one ..

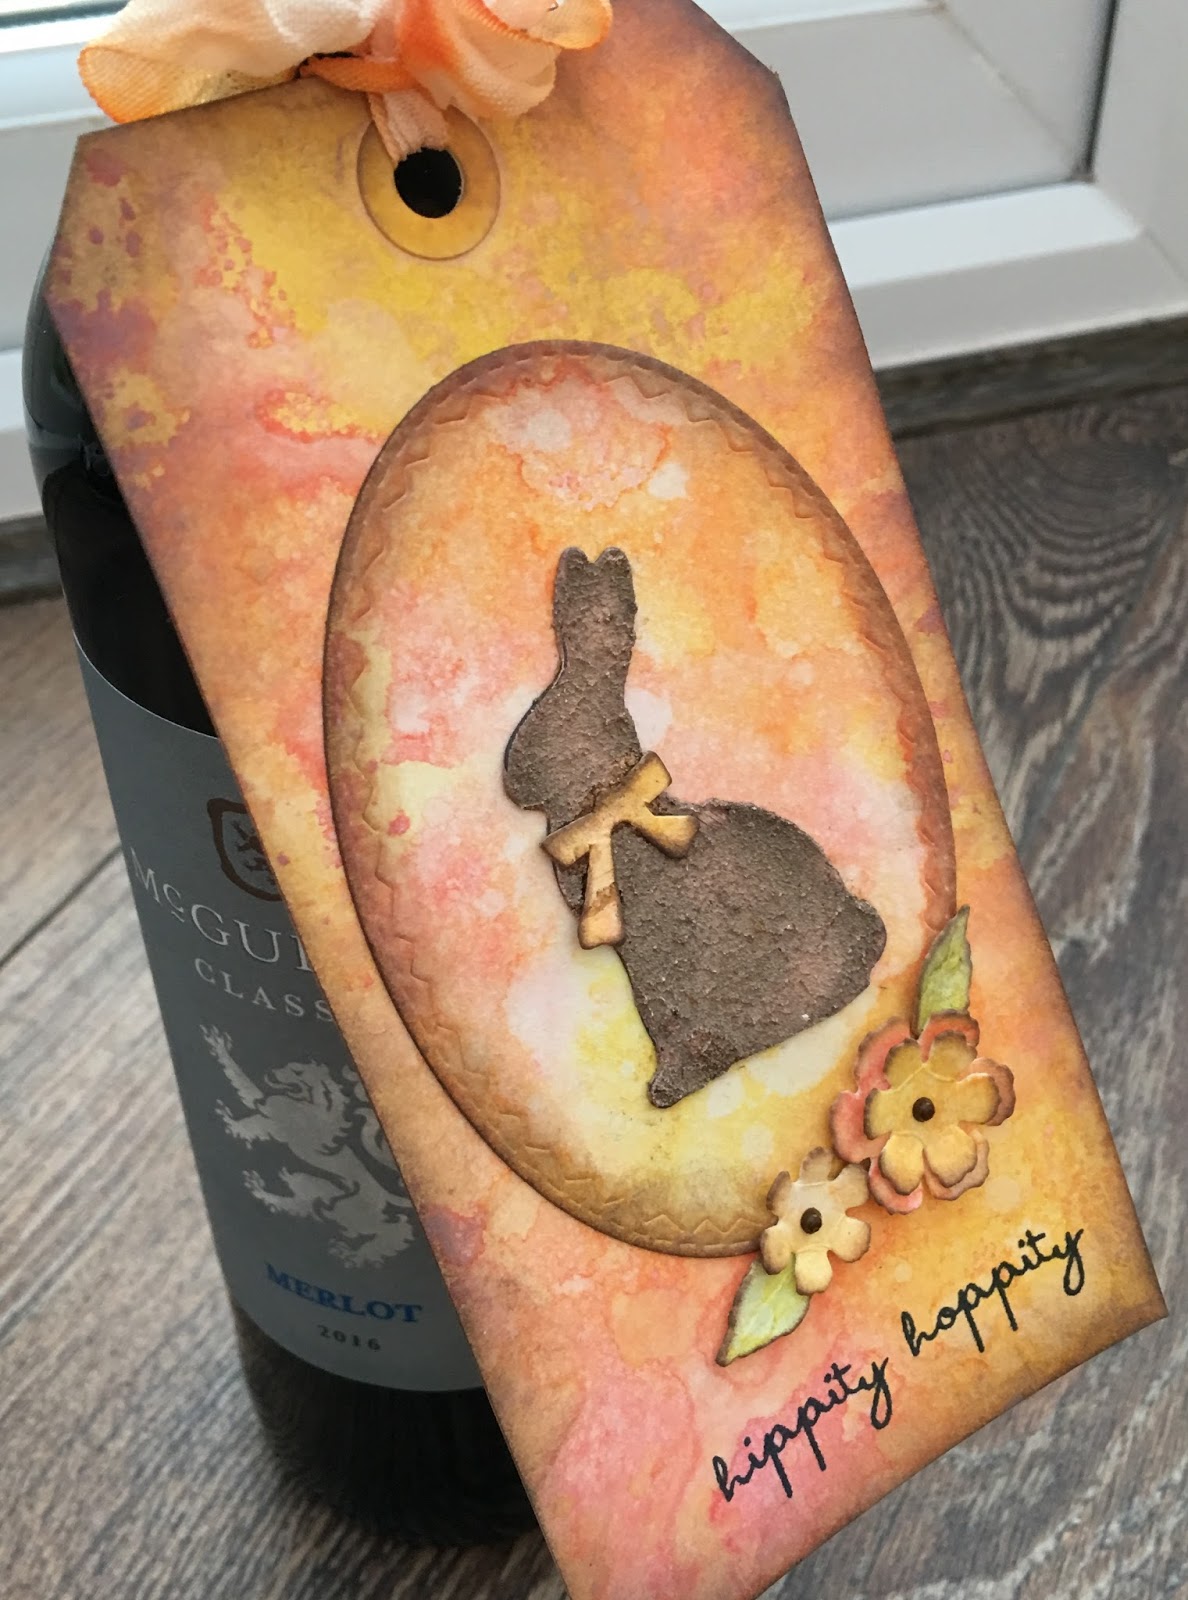
I also made some matching tags , minus the paste in the same way ...


And people are always asking how I use my tags ...so here is how...this was part of an Easter gift for my Mum and Dad...and I think the tag looks so much nicer than a bottle bag...


so there you have my Easter makes

I would like to enter my Easter makes over at Simon Says where the challenge is hip hop -

Have a Happy Easter

trace x

Thursday, 16 March 2017

Make A Wish for Country View Crafts

Well it is my turn over at Country View Crafts again here  with the results of some stolen moments of playtime...using distress oxides and my new paper dolls!!

Well like many Tim Holtz fans the distress oxide inks are featuring in my stolen moments of playtime and todays make is using them ...and I am in love with these gorgeous inks , although,  limited time to play means I feel I have only scratched the surface of what they can do ...

So when all my ideology goodies arrived from the lovely Susan ... including my eagerly awaited paper dolls, and boy I was not disappointed they are gorgeous!!  I found  a few stolen moments to play..and here are the results :


all the details of how I created this can be found over at Country View Crafts here.  

i am so in love with these inks!! and look forward to playing soon with lots more ...my  previous card created with them can be found here .


trace x

Thursday, 2 March 2017

explore, dream, discover for Country View Crafts

Well like lots of others I have been eagerly waiting to get my inky paws on the new distress oxides from the one and only crafty master , Tim Holtz. So have been playing with some backgrounds (which I will share later ) - and now here is a finished piece .

and a card too :


So all the details of how I created this can be found over at Country View Crafts here .

keep those fingers inky!
trace 


Tuesday, 14 February 2017

Happily Ever After

Well it has been a while but I am back over on Country View Crafts blog with a vintage inspired valentine.... and the project can be found here .

So here is the make :


and for all the details of how I made this please hop here  and a huge thanks to Susan for letting me pop back .... hopefully a bit more regularly x

Trace x

Monday, 2 May 2016

There is beauty in simplicity


So a simple make for today , using a non brown favourite distress colour of mine, tattered rose...
I just love the softness of it and yet I am so not a pinky person and yet this colour has found a way into my firm favourites list ..

So here is my simple card for today ..


I started by spritzing the card with water and then tattered rose and antique linen distress spray stains..


I then dried adding more water ...before adding some stencilled detail  using latticework stencil


I added the stencilled detail,using tattered rose distress ink, building soft layers..


I also added some stamped layers , again in tattered rose distress ink  using lattice work stamp from latticework and flourish set of Tim Holtz stamps...then added some script stamping in frayed burlap , before edging the card in walnut stain distress ink.

I completed the base of the card using seam binding, dyed with tattered rose ..


I die cut some pieces using the new wildflower thinlits, inked with tattered rose and edged wit walnut stain distress ink.

As you will see I punched some butterflies but decided not to use them in the end..


I added them to the front of the card and added a small talk sticker to complete this simple make.


  and there we have a simple  card , which could easily be made to suit any colour palette.


keep those fingers inky!
trace x

Saturday, 29 August 2015

The colours of Summer for Country View Crafts summer challenge


For my second offering for the Summer challenge over at Country View Crafts , I have again used the gorgeous summer seahorse die to create summery card - hopefully reflecting the colours of the sea and the creatures hidden beneath .x


I created an inky layered and stencilled background, building soft layers of stencilled ink , spritzing with water and finally adding walnut stain distress ink to the edge.. I love the watery feel the splashes / spritzes of water give when mottled with the inky layers..


For the seahorse I applied some texture paste through a stencil and left to dry and then added orange tone distress inks, adding walnut stain lightly to the edges.. Some die cut winter foliage from Tim Stack paper...lightly inked made for the sea weed


To complete the card I added a hashtag stamp to the bottom...


To finish off I added some tied , dyed seam binding to the card tied to form a bow.


So there is my simple summertime make ...as time has been a bit short....


keep those fingers inky!
trace x

Monday, 6 July 2015

Butterfly dreams - sneak peak for Country View Crafts

Well for my first offering over at Country View Crafts this month I have been playing with the motif paper stack from the one and only Tim Holtz ...

so here is my sneak peak and for all the details please hop here to see how I created this card.


I will be back in a couple of days with my next offering x 
until then ...keep those fingers inky!

trace x 


Wednesday, 24 June 2015

Top dad

Just a quick one today to share the card I made for the children to send to Steve for father's day... 

So here it is :


I started by die cutting the trophy from a thick card and covered in Decoart crackle paste and left the paste to do its magic !

I then covered with a layer of grey Decoart paint and left to dry.


I love how the crackle can be varied depending on how thickly you apply the layer of paste


For the next layer I added a layer of black antiquing cream and then left to dry, rubbing back using a damp cloth ..allowing some to stay on the piece. I then applied a layer of matte sealer (again from Decoart).

Finally I applied a thin wash of quinacriodine gold paint...left to dry and re applied in areas..


Now for the background... I applied some frayed burlap to my craft sheet and a spritz or two of pumice stone distress spray stain. I spritzed the card and then swiped through the inky droplets...dried using heat tool and then re dipped into the remaining ink to create the splattered look. 
 I then heat dried again .


I added it to the card front, inked the edges with walnut stain distress ink and also added some stencilled detail using walnut stain.


I then added Dad , using worn text letters inked in jet black archival.


To complete the card I added some seam binding which I dyed with aged mahogany and tied around the handles. I also added a star to the front.


Well hope you like the card and will be back soon!

Monday, 12 August 2013

finding a way to make it work for creative expressions DT

well today I have a post for Creative Expressions and am still playing with texture paste,I love steampunk so that features too...but it is a card! I am by no means a true cardmaker and there are many out there far more skilled than me , but as cards go I am happy with this...lets see  what you think!?

So here is my make :

I started by cutting a piece of mountboard to the size of the card, as this would take me messing around with inks and paints better than card, but heavy cardstock would be fine. I applied silver texture paste through a great netting stencil. Then I added some distress stains swipes in tarnished brass and black soot...these are just to colour the background.


I then set too with my beloved distress paints, again black soot and tarnished brass, applied to the craft sheet and spritzed and smooshed in. then I heated to dry, which makes the texture paste bubble and pit, great for this type of piece, for a smooth finish, avoid heating.


the next step was to add some more layers , I used some great steampunk stamps and inked in clear and embossed with black detail embossing powder.


I continued this randomly all over the background. Then stamped the main pieces in black archival and coloured up using distress inks in black soot and rusty hinge.I then spritzed and dabbed off.

 
Now for the cogs, I die cut some cogs and added texture paste in a bumpy manner and left to dry. When dry, I applied some tarnished brass distress paint and then some black soot using my finger tip .


 a few film strip die cuts and the card is complete..

 
So hope you like my texture paste step by step make, 

have a fun and inky day!
trace x 

Tuesday, 23 July 2013

thanks you teachers..

well the time has come for the last day for the boys at school for this year and so I have actually made the cards for the teachers this year...as you know I am no card maker and for some reason find them a huge challenge...but wanted to create a card to say thanks...I also made bottle tags and will show you those later in the week.x

I am a huge admirer of Jenny , whose amazing blog can be found here and think these cards were subconsciously influenced by her effortless card making style, (think I have a way to go...but happy with these)

so here they are :

 
I started by applying some texture paste (studio 490 white ) to the card and then when dry set too with distress inks in frayed burlap, broken china and walnut stain. I added some ink through the stencil too..

Over the raised areas I swiped some treasure gold in white fire...

The main image is from paperboy Artistic Outpost set, love this set! Finally inked it up..more makes from this set soon.. I stamped it onto an ATC die cut using Tim holtz ATC die. I also cut the top edge using notebook on edge die.


Some inking, spritz and flick and removing colour from face using water brush finishes this make. Oh and some of the torn notebook peeping out from the image...

The sentiment is from Tim Holtz set.

I hope the boys are having a fun toy day, although know for James, it will be hard saying goodbye to his teacher who truly has gone above and beyond to look after James x

have a fun and inky day!
trace x